http://arduino.cc/en/Tutorial/Blink 원문글
Learning Examples | Foundations | Hacking | Links
Examples > Basics
깜박임
이번 예제에서는 아두이노의 물리적 출력을 볼수 있게하게 간단한 것을 보여준다. LED를 깜빡이게 한다.
필요한 하드웨어
- 아두이노 보드
- LED
회로도
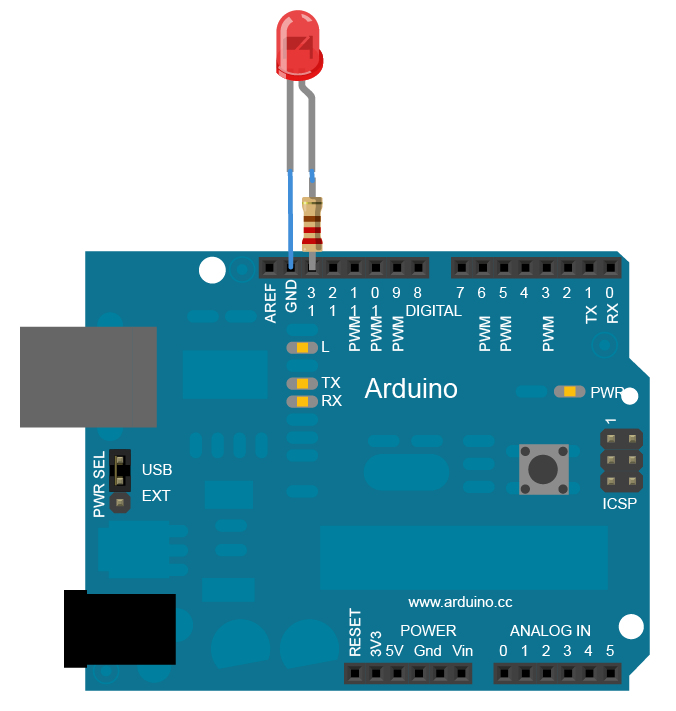
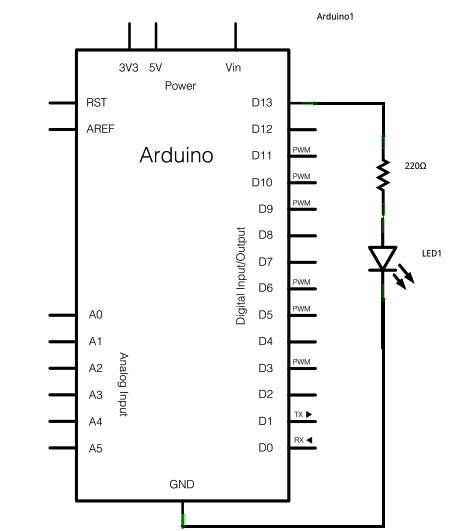
회로도를 구성하기 위해 13번 핀에 220옴 저항을 연결한다. 그런다음 LED의 긴다리 부분(양극)을 저항에 연결한다. 짧은 다리 부분(음극)은 기판의 그라운드 GND(13의 왼쪽)에 연결한다. 그런다음 아두이노 보드를 컴퓨터에 연결한다. 이제 아두이노 프로그래밍을 시작하자. 밑에 있는 코드를 입력한다.
대부분의 아두이노 보드는 보드자체에 13번 핀에 LED를 가지고 있다. 만약에 이 예제를 다른 하드웨어를 연결하지 않고 실행을 하면, LED가 깜빡이는 것을 볼 수 있을것이다.
구성도
코드
아래 프로그램에서 해야할 첫번째 일은 라인 출력 핀인 13번 핀을 초기화 하는 것이다.
pinMode(13, OUTPUT);
메인 루프에서 라인으로 LED를 켠다.
digitalWrite(13, HIGH);
13번 핀은 5볼트를 공급한다. LED핀에 전압 차이를 만들고 불을 켠다. 그런다음 라인으로 불을 끈다.
digitalWrite(13, LOW);
바로 위의 코드는 13번 핀을 0볼트로 만든다. 그리고 LED를 끈다. LED를 켜고 끄는 사이에 변화하는 것을 사람이 볼수 있게 충분한 시간이 필요하다. 그래서 1000 밀리초(1초)동안 아무런 일도 하지 말라는 delay() 명령어를 주고 아두이노 보낸다. delay() 명령어를 사용할 때, 그 시간동안은 아무런 일도 발행하지 않는다. 기본 예제를 이해했다면, 다른일을 하면서 딜레이를 만드는 방법은 BlinkWithoutDelay 예제를 확인하라.
이 예제를 이해했다면, 아두이노에 연결된 스위치를 읽는 방법은 DigitalReadSerial 예제를 확인하라.
Blink
Turns on an LED on for one second, then off for one second, repeatedly.
This example code is in the public domain.
*/
// Pin 13 has an LED connected on most Arduino boards.
// give it a name:
int led = 13;
// the setup routine runs once when you press reset:
void setup() {
// initialize the digital pin as an output.
pinMode(led, OUTPUT);
}
// the loop routine runs over and over again forever:
void loop() {
digitalWrite(led, HIGH); // turn the LED on (HIGH is the voltage level)
delay(1000); // wait for a second
digitalWrite(led, LOW); // turn the LED off by making the voltage LOW
delay(1000); // wait for a second
}
같이 볼것들
- setup()
- loop()
- pinMode()
- digitalWrite()
- delay()
- BareMinimum: The bare minimum of code needed to start an Arduino sketch.
- Blink: Turn an LED on and off.
- DigitalReadSerial: Read a switch, print the state out to the Arduino Serial Monitor.
- AnalogReadSerial: Read a potentiometer, print it's state out to the Arduino Serial Monitor.
- Fade: Demonstrates the use of analog output to fade an LED.
- ReadAnalogVoltage : Reads an analog input and prints the voltage to the serial monitor
'iDev > Arduino' 카테고리의 다른 글
| Makey Makey 사용기 (1) | 2012.09.08 |
|---|---|
| 아두이노 튜토리얼 기본 - 필수적인것 (0) | 2012.08.05 |

